
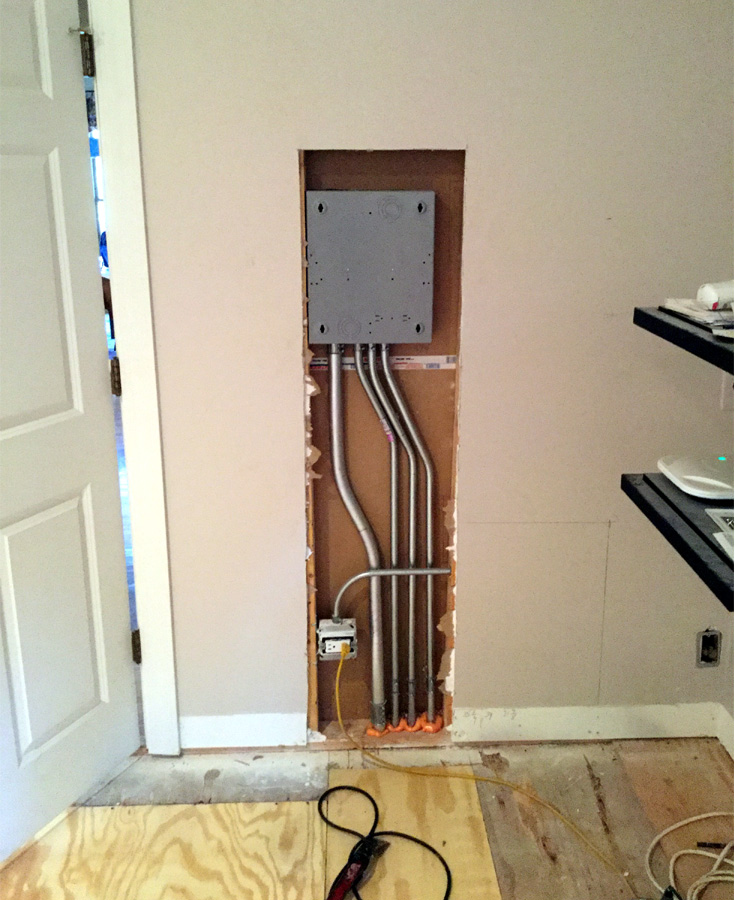
8 Gauge Electrical Cable; JPS Labs In-Wall Cable. I spent some time researching audiophile grade in-wall power cable. There were several apparently good options and I settled on JPS Labs Power AC In-Wall cable. This is 10 gauge noise-rejecting cable at $24 per foot. I chose it in part because several other high end in-wall cables were 12 gauge, and my general experience has been that lower gauge worked better with amps. I had to order twice, because I did not order enough the first time to cover enough length for the two outlets I expected to use for the whole system. However, I also had the electricians install two other dedicated outlets, but wire them with regular commercial-grade 8 gauge cable. Since I installed a separate dedicated 100 amp box exclusively for the audio system, and since I determined not to have any 30-amp circuits (for my amps only) I ended up with 5 separate 20-amp circuits dedicated to audio – 2 with the 10 gauge JPS Labs In-Wall cables, 2 with commercial 8-gauge cable and 1 with standard 14 gauge cable. My rationale was that (1) I’d be able to test the actual effect of using each circuit; and (2) because we installed conduit for each cable it would be easy to pull new cable to replace it.
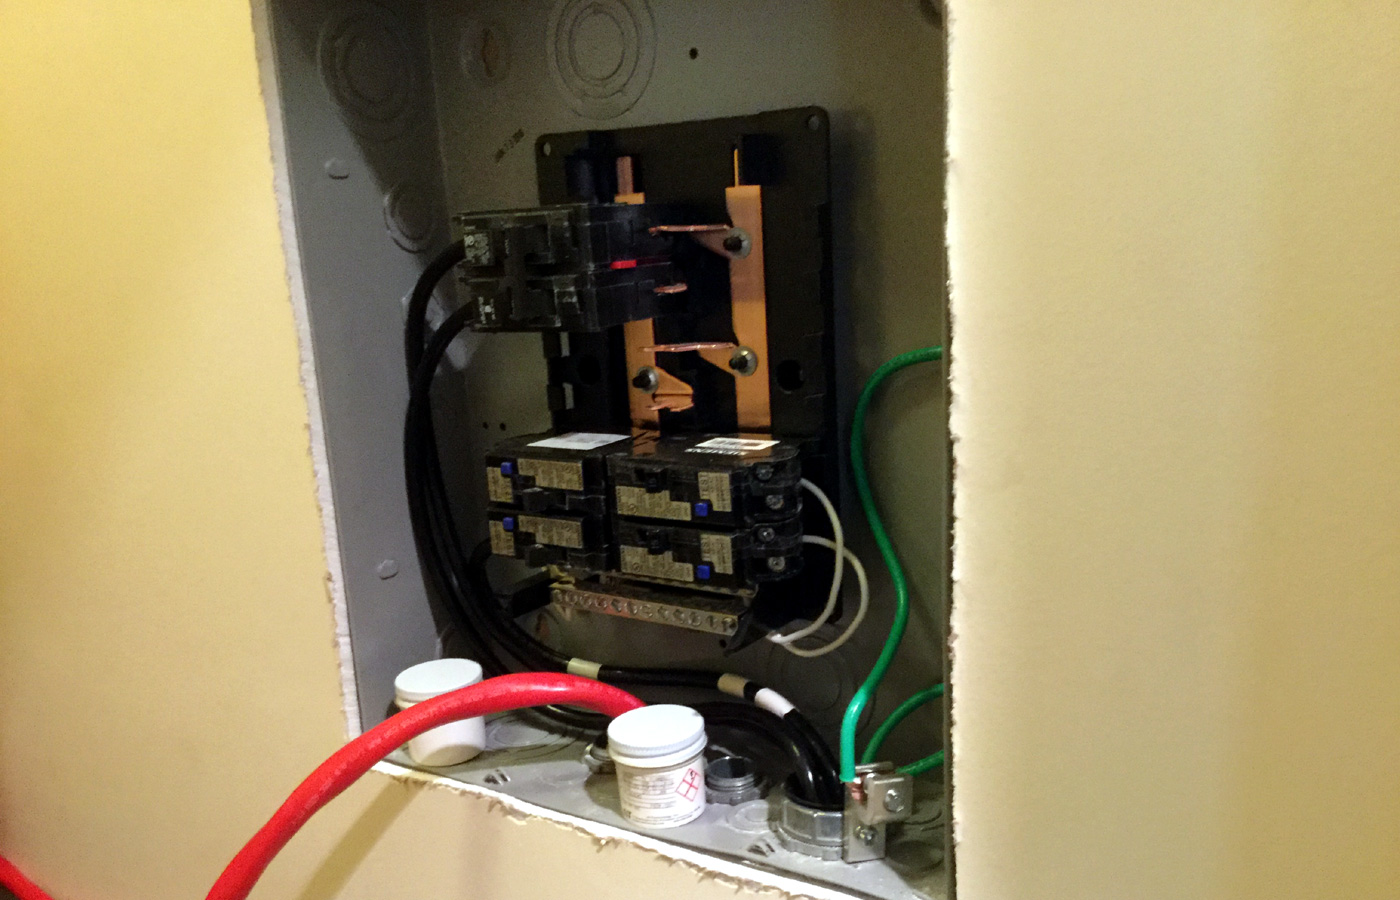
Below are pictures of the new electrical box installation, with the second picture showing the access to the box from an adjoining closet.
When my reconstruction was completed I had intended to continue biamping my speakers. However, the very first thing that came in for review when the project was complete was the Esoteric Grandioso C1 and M1 preamp and monoblock amps. I originally plugged the monoblocks into one of the 20 amp outlets wired with the JPS Labs cable and the C1 and my entire front end into another 20 amp outlet. The sound was very good. I then plugged each monoblock into a separate 20 amp circuit and plugged some of my front end into one of those same circuits and the rest into the other circuit, so that each monoblock would have access to more power. The sound improved perceptibly. I then plugged each of the M1s into a separate 20 amp outlet wired with the commercial 8 gauge wire and the entire front end into a 20 amp outlet wired with the JPS labs cable. The Esoteric representative (who brought the components for review) and I looked at each other and didn’t have to say a word. Plugging the monoblocks into the outlets wired with the 8 gauge cable clearly sounded better than using the outlets wired with the JPS Labs 10-gauge cable, especially in the bass response and sense of body. To be sure we weren’t hearing some anomaly, I plugged the front end into the same two 8-gauge circuits so we would mimic the prior configuration. Even though the highs were more muffled, the same improved bass and body remained. The best combination was clearly the monoblocks on the two 20 amp circuits wired with the 8 gauge cable and the front end on one of the two 20 amp circuits wired with the JPS Labs 10 gauge.
Furutech GTX-D NCF(R) Outlets. The other surprise related to the outlets for the dedicated audio circuits. I’d already been using upgraded outlets from Walker Audio, Synergistic Research and a few others. All of them improved the sound in specific ways – some more forward, some brighter, some faster – but in all cases I have to say that in my own system their improvements were fairly modest. However, I had heard some scuttlebutt about the newest Furutech outlets and decided to give them a try. This time the improvement was not subtle. The bass became much deeper and fuller, the vocals more natural and the soundstaging much more realistic and expansive. I have to say that every aspect of the presentation became better. This applied to all four circuits – both the circuits using the commercial 8 gauge cable and the audiophile 10 gauge JPS Labs In-Wall. I do not know whether the improvements would be as noticeable with regular 12 or 14 gauge wiring, but in my case every person who listened noticed. Adding these outlets was the crowning touch to the electrical system. They were so good that I may need to do a separate review and provide more detail.
About Connection Enhancements: McMaster-Carr 1219K57, Electrically and Thermally Conductive Grease. Several folks have promoted the use of silver paste/grease to enhance connections between electrical wiring, outlets and plugs. Among the most noteworthy is Lloyd Walker and his E-SST Contact Treatment. Most of these items incorporate silver flakes in a suspension in some type of oil or other grease. Unfortunately, in some cases, despite the initial improvements, the paste dried out and actually created audible negative effects. This wasn’t an issue on connections that could be easily accessed and cleaned so that the treatment could be reapplied, but was not practical in my plan to add silver treatment to every connection from power inlet through audio circuit outlets. After some research, I stumbled upon McMaster-Carr 1219K57, Electrically and Thermally Conductive Grease, which reviews indicated did not dry out and has a very long life. I recommend you try it. However, be sure your electrician does not use too much. Mine initially used way too much at the outlet connection, and it resulted in a very “hot” presentation. After he wiped off most of the paste the sound became very fast and powerful, but with natural tonality.
Room Correction Added. Despite the significant efforts I’ve made with room treatments, I’ve been using room correction to great effect now for nearly 10 years. Despite some mild anomalies that can be created, my experience with electronic room correction has been very positive, with the improvement far outweighing any drawbacks.
Legacy Audio Wavelet. That’s why at several audio shows I took great interest in the Legacy Audio Wavelet, which was initially designed to be used specifically with Legacy’s top-of-the-line V system speakers. After a few shows I also noticed that some other exhibitors were using the Wavelet to showcase their own equipment, and I decided to approach Bill Dudleston about reviewing the Wavelet as a separate free-standing device in non-Legacy systems. After all, we’re talking about an extremely versatile piece of equipment that is a preamp, DAC, crossover, room correction and room enhancement device controllable by a tablet or phone. I will be doing a full review of the Wavelet, but I can tell you right now that this device can easily replace my MBL 1611 F DAC, Lyngdorf RP-1 room correction device and BSG Technologies QOL Signal Completion device (collectively over $35k retail) without any loss of fidelity, not to mention the savings in interconnects. (My MBL is an enhanced DAC with an analog volume control and analog inputs, but if I was using a separate preamp I’d also be able to eliminate that.)
In any event, the Wavelet’s room correction capabilities are the best I’ve ever heard, with no anomalies that I can detect, and it really completed what I sought to accomplish by correcting for the few remaining room effects I couldn’t address with room treatments, vibration control (see below) and electrical power enhancements. I was done…EXCEPT…
Synergistic Research FEQ and HFTs. I’d been using the Synergistic Research FEQ and HFT’s for several months prior to starting my listening room remodeling. I took the plunge without auditioning them, and achieved some nice but modest improvements following the manufacturer’s suggestions. I simply reinserted them the same way after the renovation was done. However, about a month after I finished all my other system tweaking I realized I had one extra HFT 2.0. Impulsively, I added it to the front wall, which already had 7 HFTs of various types on it, all placed where suggested by the manufacturer. Much to my surprise, adding the single HFT 2.0 to the center of the front wall seemed to improve the vocals. I removed it to check if I was imagining things. Sure enough, the vocals lost some of their vibrancy. I had always had difficulty hearing improvements when placing HFTs on my speakers in accordance with the manufacturer’s suggestions, so I replaced the single HFT 2.0 in the center of my front wall, and then took two HFT 2.0’s off of the speakers and added them to the front wall to the right and left of the center HFT 2.0. Damned if it didn’t make a very audible positive difference. The dimensionality of the soundstage improved, especially the depth of the sound. For the next 2 days I experimented with multiple front wall placements and eventually removed every HFT from my speakers and side walls and limited their use to the front and rear walls, with the vast bulk of the HFTs on the front. The very next day one of my listening buddies dropped by and within 5 minutes asked what I had done to get that much improvement in soundstage depth and midrange brilliance. The whole experience reinforced something that I have periodically concluded during my audiophile career: experiment freely with seemingly small adjustments and you may get totally unexpected improvements.
Vibrations. Vibrations both big and small can have very audible effects on the listening experience. As mentioned in Part 1, my listening room floor was elevated on joists and had significant “bounce” you could feel while walking across it. That’s why I used 2 dual wall-mount turntable stands drilled into the front wall’s supporting studs to hold my system’s front end. I also used amp stands to get my amps off the floor. As also mentioned in Part 1, we determined it was impractical to pour new concrete under the entire floor, so we poured two long supporting concrete strips under 2” x 8” floor joists located under the front of the room. This effectively eliminated the “bounce” in the room and enabled us to build in the floor bass traps described above. However, an additional unexpected side effect of taking this approach was the ability to preserve the desirable bass resonances that the floor cavity created in the past.
Resonance in the Floor. Go to any symphony hall (OK, I don’t know that this is true in every symphony hall, but certainly all the ones I’ve seen) and you will see the stage is a wood floor and has a cavity underneath. Furthermore, if you listen to a double bass being played on solid concrete compared to that same double bass on a wooden stage with a cavity underneath, you’ll hear a difference in the resonance in the two venues. I don’t know if it’s “right” or “wrong,” but I strongly prefer the sound produced in the venue with the wooden floor with a cavity underneath it. My music room previously had that quality, and that acoustic aspect of the room was retained even after the floor vibrations were eliminated by the installation of the concrete strips and the boom was eliminated by installation of the bass traps. I have had a few of my regular listeners comment on the pleasing effect of the mild resonance resulting from the cavity under the wooden floor.
The Sound of Wood; Jatoba. Many audiophiles swear by maple shelving and amp stands for their equipment. However, after some research, I elected to have all of my shelving, racks and amp stands made of Jatoba wood. Jatoba wood for shelving first came to my attention when I purchased Proscenium amp stands. Jatoba resonates virtually the entire audible frequency range humans are capable of hearing, including way down into the bass. Maple’s resonances don’t go down that low. You can tell me that I’m blowing smoke and don’t know what I’m talking about, but I selected Jatoba based on this reasoning and a few unscientific experiments using difference types of wood under my components. Whether I was right or just lucky, use of the Jatoba wood for shelving has all but eliminated any type of undesirable external vibration. Four inch thick Jatoba was used for the amp stands, 3 inch thick for the shelves on the custom rack, and 2 inch shelves replaced the ½” plywood shelves of my dual wall-mount turntable stands.
The substantial weight of the four 3” Jatoba shelves used for the custom floor-standing rack was added to extremely heavy oxygen-free copper legs and points from Symposium Acoustics (maker of Symposium Rollerblocks and a wide range of equipment racks, shelves, etc.) All-in-all, the resulting floor-standing rack weighs around 250 pounds, has energy-draining points as its feet and sits on the floor directly over one of the under-floor concrete strips that were added to stabilize the room.
The 2” Jatoba shelves made for the wall-mount shelves sit on Mapleshade Black Isoblock 2’s, which in turn sit on the wall-mounted rack. Since they are not directly connected to the floor, the isolation is excellent.
I also use Walker Audio Valid Points under each front end component, and this provides a whole additional layer of isolation. In addition, the Valid Points also act to drain microvibrations from the equipment itself.
Finally, the 4” Jatoba shelves made for the amp stands are fitted with Walker Audio Valid Points and sit on the floor. They weigh about 55 pounds each. Right now the stands sit directly on the floor over one of the concrete strips that support the floor. I intend to experiment with whether I should add another layer of isolation directly under the amps between the amp and the amp stand. (Sound extreme?)
The effect of all this effort is excellent vibration control even at the highest of volumes.
Final Touches and Tweaking. Of course, I also had to do some other things. I upgraded all of my power cords from Lessloss DFPC Signatures to Reference; I was able to make ultra-fine adjustments with the features available in the Legacy Wavelet (review to come); I acquired the fabulous tuneable Stealth Dream v14 speaker cables (review to come), and I started experimenting in earnest with alternate placement of the Synergistic Research HFTs.
The net effect of all of this is the best sound I think I can extract from the room without radically changing its dimensions. Early comments from long-time visitors are very positive (though they may be just humoring me). I’m looking forward to resuming equipment reviews in this newly-refurbished room (the Esoteric Grandioso C1 and M1 review is well along) and hope that it adds to the review process.
I welcome your comments and inquiries.
Copy editor: Dan Rubin
- ← Previous page
- (Page 3 of 3)
The thought and detail that went into consideration of all the elements is impressive. I may have missed your comment about it if you addressed it, but do you find the bank of windows without any apparent treatment creates any issues with the sound?
Hi Demerara – I’m so sorry that I didn’t respond months ago to your inquiry. I failed to check the comments after posting this article. Yin short, the window bank in its configuration has very minimal effect of the room’s sound. It is well above the main listening zone of the room, and in addition, I have tuning dots on the fixed glass panes, and they have always worked for me to control glass reflections. However, I would never want a listening room to have regular windows or tall windows without having acoustic curtains in place. — Ed Momkus
I am also in the process of building a dedicated A/V room in my basement. I also have been thinking of the installing built- in bass traps. Can the traps be initially tuned to a particular frequency by first varying the size of the cavity along with the size of the opening in the wall? Would the damping material then be used to fine tune the trap? I’m starting with a decoupled room.
Hi Ostap – I’m sorry about the delay in responding to your inquiry from when you first posted your question. I’m probably too late, but here goes. I’m not an acoustics expert by any means, but I have learned some basic principles. First, the thicker the absorptive material the more effective it will be. In my opinion, a 4 inch thickness is the MINIMUM, and 8 inches is much better. Second, the bigger the rear cavity the better – at least 12 inches in my opinion. This is already unacceptable in many rooms. There is a mathematical formula you can look up that calculates the ideal cavity size, and the size is huge – you would in effect have to build a room-within-a-room and lose four or more feet on every wall, and that doesn’t address floor-to-ceiling issues. Note that, conceptually, the sound waves pass through the absorptive material once, dissipate further as they traverse the cavity, hit the rear of the cavity and bounce back, then pass through the absorptive material a second time before returning into the open room. The lowest notes need more thickness/cavity size, so in this sense you can “tune” the bass tap, but really you’re just making it more effective in absorbing the entire bass frequency range. Remember that most of the available absorptive materials absorb full-spectrum (including everything above the bass range), so you also need some reflective material on the front to reflect minds and highs. Otherwise your room will be too “dead”. (Of course, this material must allow the bass to pass through.)– Ed
Really informative article. I have a question about the Legacy Wavelet and its ADC. Since I listen equally to digital and analog (VPI Classic 3, TriPlanar Mk VII Ultimate arm, Dynavector XV-1s cartridge, and Pass XP-15 phono), it’s important that the ADC is up to the task. Will the Wavelet be equally good for both formats?
I’m also intrigued by your custom Jatoba rack. Where did you source the Jatoba shelves?
Hi Paul,
I have to first apologize for the delay in responding. I just submitted my review of the Wavelet, and it should be published soon. In a nutshell it is highly recommended.
I need some clarification on your question about the “ADC”. I’m not aware of any Analog-to-Digital conversion done by the Wavelet. It has its own DAC, but a digital outboard device that has its own built-in DAC can be plugged into the analog inputs, and analog sources just get plugged in the analog inputs the same way.
If your question is how the Wavelet sounds when using the analog inputs, it’s very good. I did not specifically do a critical-listening comparison of vinyl sources, but I did listen to digital devices that had their own DACs, and the sound of their analog output into the Wavelet’s analog inputs was quite good – IMO equally to very high quality analog preamps.
As for the custom Jatoba racks, I had a carpenter select and make the shelves. He sourced the Jatoba slabs from a well-known local commercial lumber distributor – Oak Hardwood Lumber in Lombard IL.
Ed, great article. I have the Esoteric Grandioso C1 and M1 amps as well. I also ran multiple dedicated 8 gauge circuits of the same exact length. My question is if I run a JPS Labs in-wall power cable for a separate circuit just for my front end, will I get a ground loop problem if the length is different than my 8 gauge circuits? Thanks.