
Viella Tonearm
In my review of the DaVinciAudio Grand Reference Grandezza I said, “it is a visually stunning, genuine work of art. The wood and metals come together like beautiful artwork, and the bearing assembly is built with all the magnificence and detail we have come to expect from the Swiss.” Well, the AMG Viella twelve-inch tonearm is what I would expect from a superb German tonearm. That is, it’s well engineered, with outstanding execution, beautiful build quality, but no bling. It has a simple, understated style that I find much to my liking.
The bearing is a dual-pivot design with the vertical bearing design being similar to that used in the rotor heads of helicopters. It uses two 0.5mm thick “spring steel wires” that allow the fine tuning of the azimuth while also eliminating any play in the bearing. The horizontal axle is hardened tool steel, precision ground to a backlash-free fit with a needle roller bearing. AMG claims it is extremely precise, maintenance free, and never requiring adjustment. The tonearm wand is made of aircraft quality, anodized aluminum tube for resonance control with an effective mass of twelve grams. The counter weight is a two-piece design with a Teflon, decoupled sleeve. It is wired with three strands of 50 micron high-quality copper per leg. Anti-Skating is of the magnetic design with a decoupled ring magnet and two bar magnets. The magnetic fields are isolated in their patented bearing housing. VTA can be easily adjusted during play, but you will need to lock the arm after setting it. To make this even easier, there is a spirit bubble built into the top of the bearing cap.

Setup
Setting up a new turntable from scratch is always quite a chore. There’s the table itself to set up, then the tonearm, and finally the cartridge. Still, in the scheme of things the V12 is not difficult to set up. I think I’ll take the time to walk you through this in case you buy one of these wonderful tables.
As you unpack the exceptionally well designed shipping container, you need to take everything out and sit it somewhere safe. Then, pick up the plinth and the tonearm wire and run the DIN plug up into the hole in the tonearm base. You need to set the plinth on the surface where you plan for it to sit. Next, orientate the oval plinth to your desired position; most people like to angle it with the tonearm mount in the back. Then level the plinth as instructed in the manual.
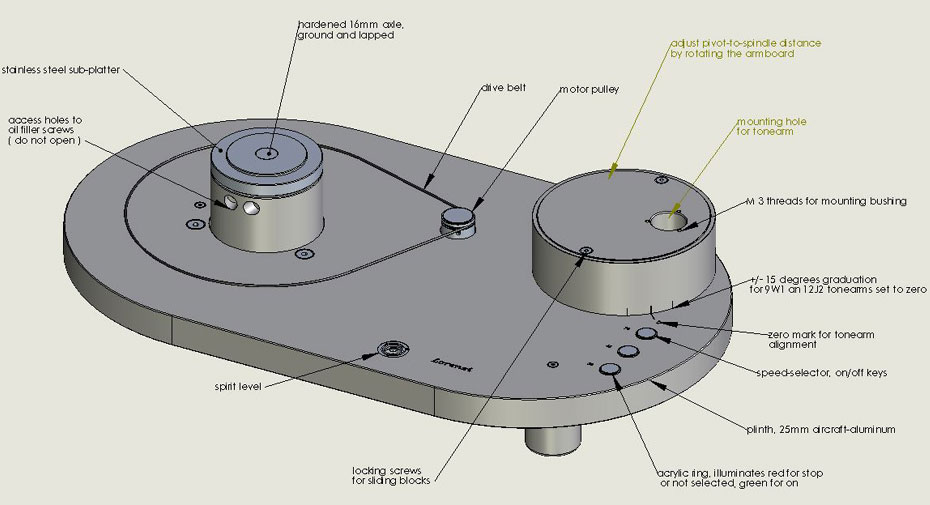
Now, you’re ready to put the belt on the platter. Be careful as the platter is surprising heavy, because of so much of the weight being on the perimeter. This step involves a jig that is supplied, use it! If you use it as instructed, then everything will go well with putting the platter on and getting the belt on the motor. Next, take the two wood blocks that are provided and place them on either side of the plinth where the platter will sit; be sure they stick out beyond the plinth so you can easily pull them out. Now, align the jig with the belt on it with the motor and slowly lower the platter onto the bearing housing and sub-platter. When it is on correctly and sitting on the wooden blocks, take a jeweler’s screwdriver and gently lower the belt off the jig and it will snap onto the motor pulley. Well, it will if you got the alignment right and didn’t get in too big of a hurry easing the belt off the jig, it only took me two tries. This is the most difficult thing about setting up the table and it’s not that hard, but you surely don’t want to get it on and then remember you didn’t level the table, because the leveling screws are recessed in the plinth under the platter.
Now you can proceed according to the manuals instruction with the arm and cartridge, it’s pretty straight forward. All the tools you’ll need are provided and the manual is straight forward.
Review system and listening
I carefully removed my Shindo 301 turntable from my Box Furniture Company Audio Rack and replaced it with the AMG Viella “V12”. The V12 was connected to my Shindo Giscours preamp, with my Wavac EC 300B, and my Teresonic Ingenium Silver speakers. All the cables were Shindo EXP silver. Now came the question of what cartridges to use, and of course, what step-up transformers. I tried several including cartridges from Allnic, Benz, EMT, and London Decca. For the SUT, I also used the Auditorium 23 Homage T1, the standard Auditorium 23, the Audio Note AN-S8 step-up transformer, and the Allnic AUT2000. This was quite a learning experience and I’ll get it into a separate Beatnik article. I ended up doing the bulk of the review with the Benz Ebony TR S Class cartridge with Micro Ridge stylus. I’ll be honest – I had forgotten how good this cartridges is. Mounted in the AMG Viella 12-inch tonearm and used with the Auditorium 23 Homage T1 and the Shindo Giscours preamp, the Benz was just heavenly.
One of the first things I should mention is how wonderful all these cartridges sounded in the Viella twelve-inch tonearm. The Allnic cartridges sounded even better than they did with the RS Labs RS-A1 tonearm and RS-3 Rotary Headshell. The London Decca and the EMT sounded great also, but this arm really brings the Benz TR to new levels. This speaks well for the way the tonearm controls these cartridges without deadening them.
In reviewing the Clearaudio Anniversary AMG Wood CMB turntable I said, “The Anniversary is a whole different story though. It is considerably more transparent, quieter, and more dynamic than my Clearaudio Ambient [with Satsify Tonearm], or for that matter, the Merrill-Scillia MS21 turntable.”
- ← Previous page
- (Page 2 of 3)
- Next page →